CGSketch

architectural renderings | animations | vr

Tutorial - How to create an asphalt PBR material on Vray


See video version of this tutorial above and written below. 


    Asphalt, when present in our exterior renderings, usually takes up a big chunk of our illustration's real estate and, very commonly, at the foreground.  This means that the detail we add to our asphalt roads will be very prominently visible within our images and thus it becomes necessary to make sure they look, well ....., real. 


In this tutorial, I'll demonstrate some of the basic concepts and tools at our disposal within 3ds Max and Vray to create an detailed-as-necessary PBR material worthy of being placed in our foreground roads.  The goal is not to get you to replicate the exact material, but rather, to have you familiarize yourself with some of the tools and methods for creating complex materials.


Let's get to it.  


Here's the final product.  A street with some aged asphalt, some worn painted lines, and a the appearance of wet puddles for added measure.


This was the scene.  A very basic one at that.  A simple house, a road with a UVW Box Map, a camera and a Vray Dome light with an HDRi for illumination.  I explain how I light up my scenes in this tutorial, if interested.


Base Material 1


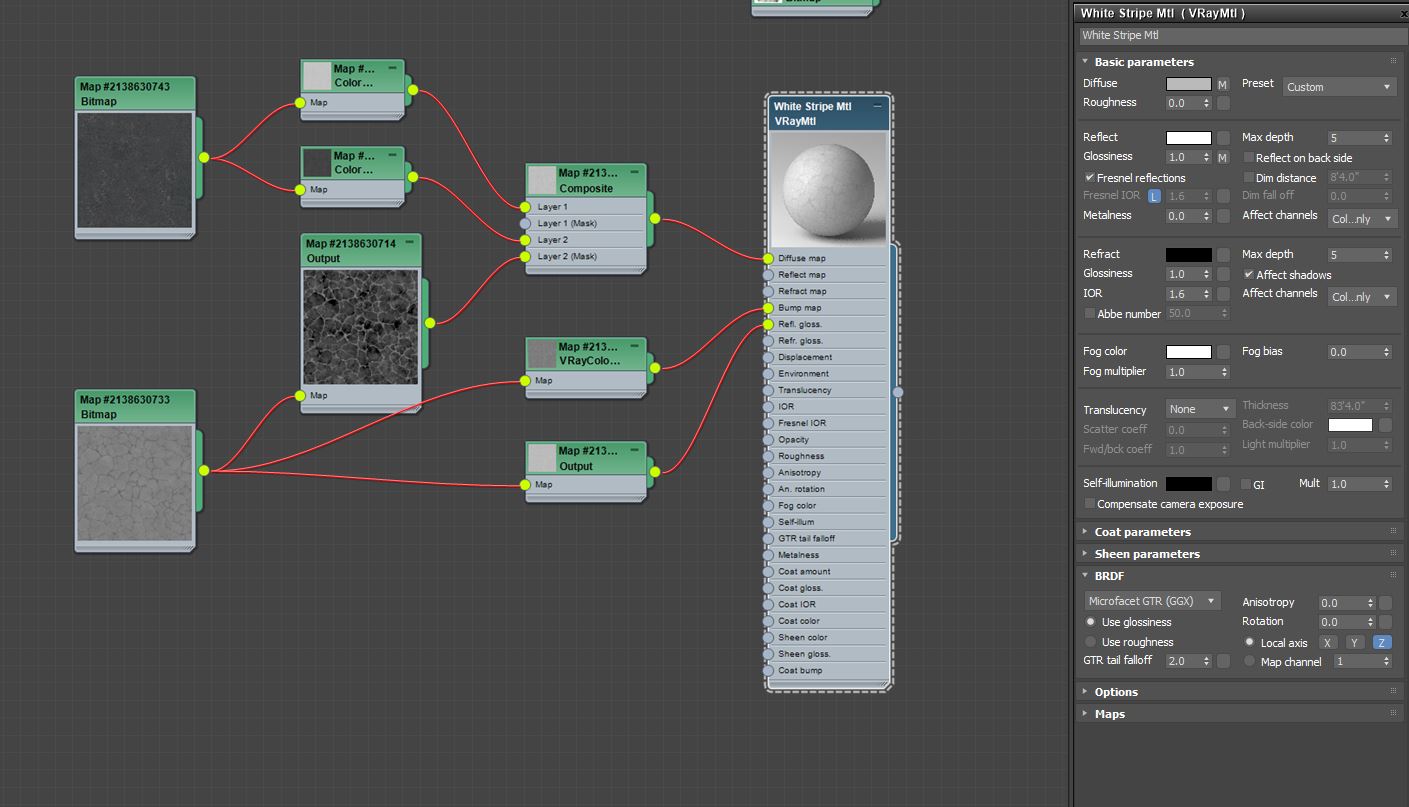
I began with a foundation material.  I grabbed a pack of tileable sbp textures over from Textures.com and applied them to a VrayMtl.   I used 2 color correction maps to create a light and dark version of the diffuse texture and blended them using a composite map. 


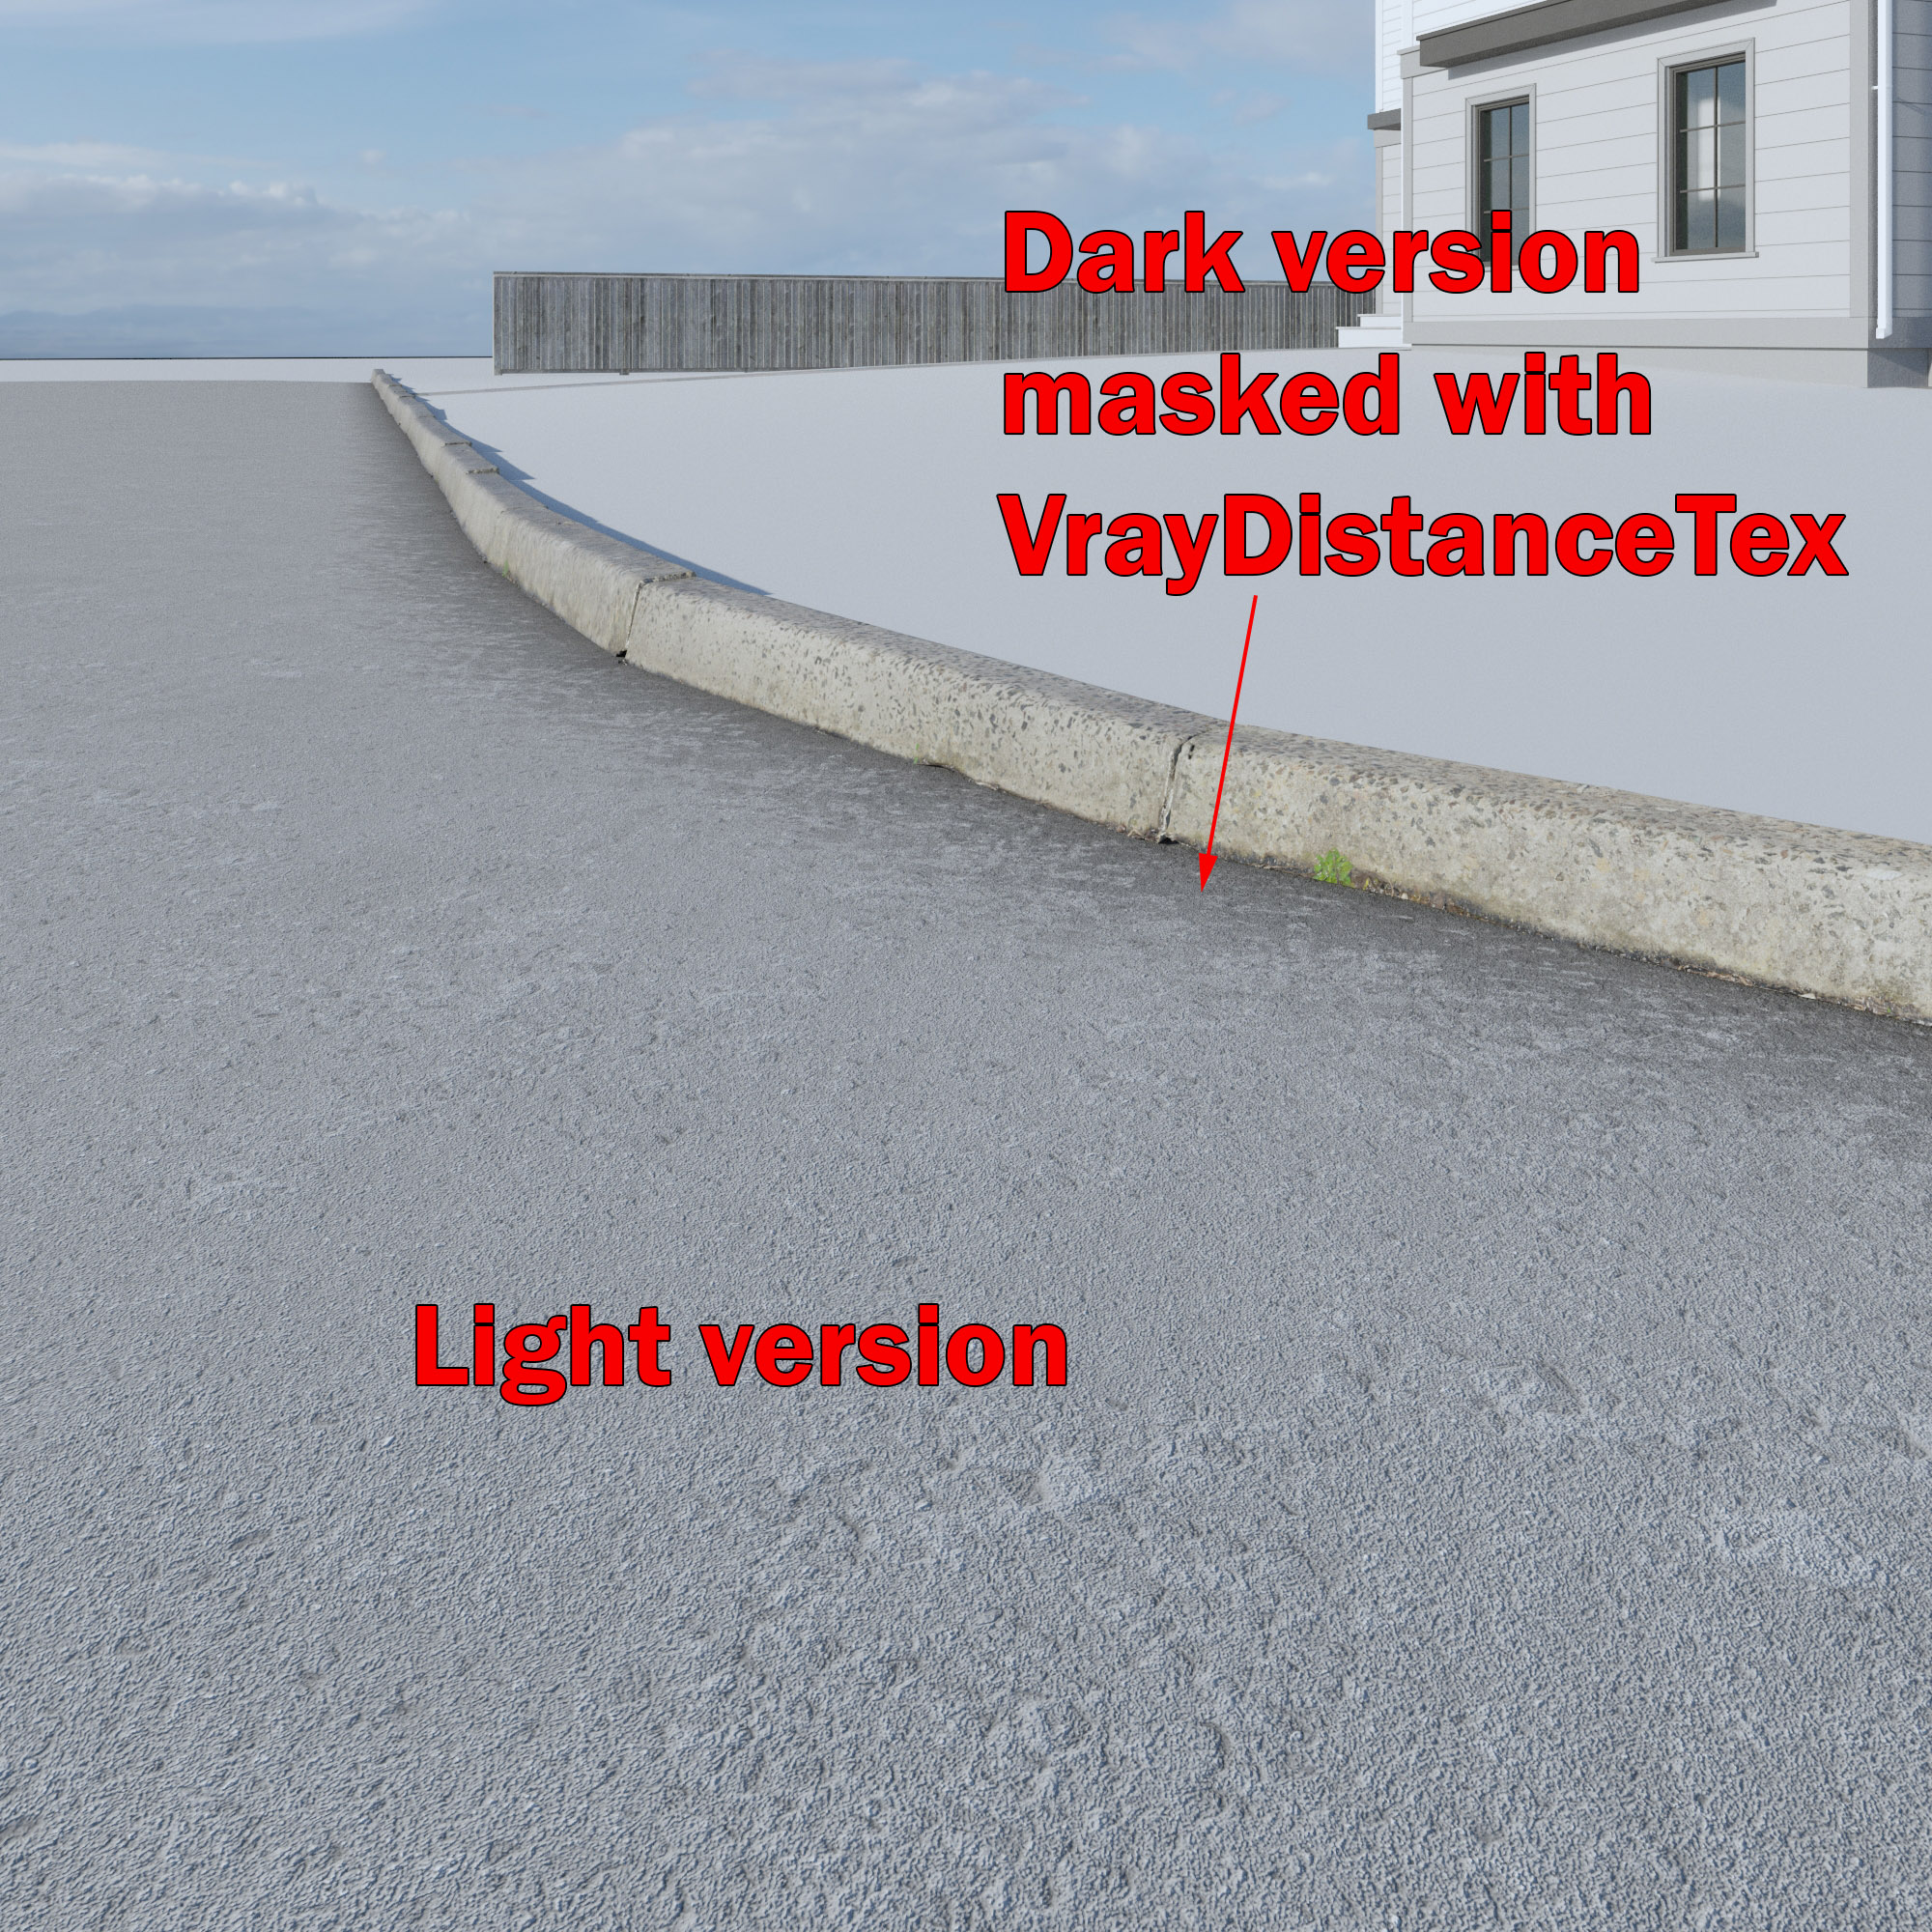
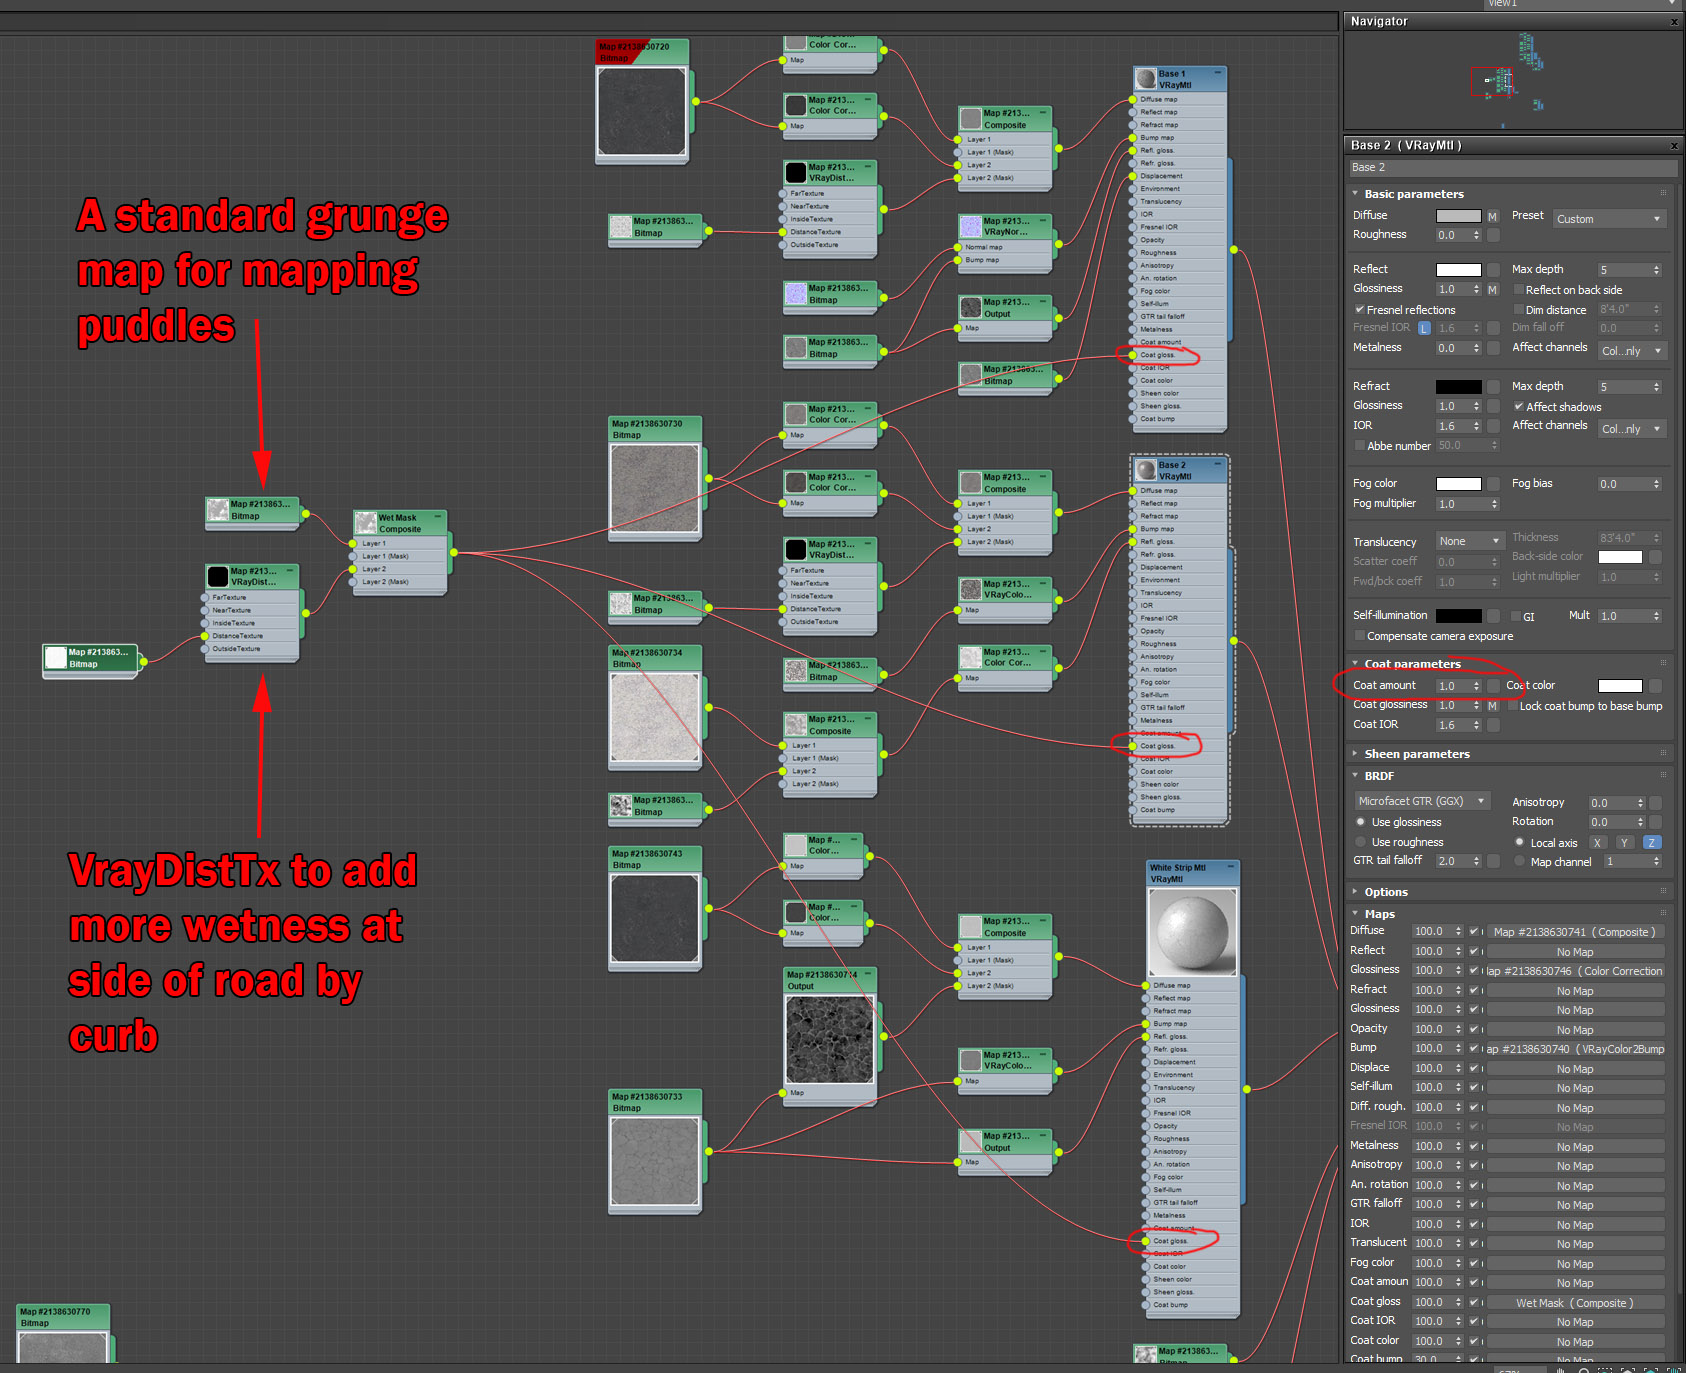
I find the VrayDistanceTex to be a great tool to mask the dark texture, by telling vray to apply the dark version 24" from where the asphalt meets the ground/curb, and thus create the sense of dirt building up at those edges.  I also used a grunge map on the distancetexture slot to add a little bit of variation.  VrayDistanceTex map is one of those handy tools that can make our otherwise boring materials have more complexity and realism.


Other than that I have a Normal Map and a Bump map attached to a VrayNormalMap Texture.  Don't forget to set the main mtl bump settings to 100 and remove the filtering from the bump texture itself for added fine grainy detail.


The reflect color swatch is set to pure white and I use an output to modify the asphalt texture and use that to control the reflection glossiness by playing with it's brightness/contrast.  


The displacement map is attached but not activated.  I solely attach it to the main material to keep my material organized.  I will later attach the displacement map to a seperate VrayDiplacementModifier that I will add directly to the road  surface itself.


Here's the result.  Notice how the VrayDistanceTex blends the dark and ligth versions nicely by the curb to simulate dirt collecting in those areas.


Base Material 2


Then I proceeded to make a second material, also using PBR textures from Textures.com, using the same method I used to create the first Base Material 1.

As you can see, the template is similar.  I once again used two color corrects to create a light and dark version of the diffuse map, and blended them using a VrayDistanceTex mask, as I did with Base Material 1.  The VrayDistanceTex setting are replicated from Mtl Base 1.


This time you will also notice that I didn't have a normal map, so I used a standard bump map connected to a VrayColor2Bump map.  As usual, make sure your main material bump setting is set to 100 and remove all filtering from the image.


Here's the result: 


Blending the two material


Now, it is time to blend the two base materials to remove some of the uniformity in order to create interest and variety.  For this purpose, I used a VrayBlendMtl, tagged both Base 1 and Base 2, and blended them using a grunge map as a mask.  

The result is a blend of both materials as prescribed by the grunge mask I used.  (If you don't have a collection of grunge maps, may I recommend the one from 3dCollective.es, their Dirt Mask Pack is incredibly useful).  Alternitively, you can just use a noise map and modify it to your liking.


As such, some of the uniformity that would otherwise be present if I had only used one material, is now gone.  This increases the complexity and interest.  See for yourself:

White Stripes


Now I'm going to add some road striping and make it look aged as well.  I begin by creating a new material using the same asphalt texture from one of my base asphalt materials, and I simply whiten it by increasing it's brightness using a color correct map.  I also included an asphalt crack mask (found online) to mask-in some cracks in the striping where it would be darker.  For this, I once again turn to a composite map.  

Of course this material would be of no use if I didn't map out where Vray should show the white stripes.  For this, I created my own mask in Photoshop by painting the lines white and subsequently simulating the wear and tear by speckling in some noise using different brushes.  Since this map was created by me, I can freely share it.  Here it is:

Then, since I needed to map this one out seperately from the original Base 1 and Base 2 materials, I set it to use Map Channel 2 and used Spline Mapping on the Unwrap UVW modifier to easily and quickly map this texture onto the road.  If you're not familiar with this process, make sure to see my explainer video where I demonstrate how to accomplish this.  This mapping method is particularly useful if you have curves on your road. If instead your road is straight, then you can easily just use another planar or box UVW mapping modifier.  


All I had to do was attach my new White Stripe material to the VrayBlendMtl as a new coat, and mask it with the above mask on the appropriate channel.  

And here is the stripe mask mapped out using spline mapping...

...and the resulting render.....


Bump for the White Stripe


Usually, when you look at striping on roads, it is painted on using a thick epoxy material that has some depth.  Let's simulate that using the VrayBumpMTL to create further control and bump out the white stripe.  


Displacement


To add a little more depth and interest, you can use a VrayDisplacementMod to actually displace the geometry and simulate the nooks and crannies.  To do so, I created a composite map of two asphalt textures I found online, one specifically chosen to have some cracks for detail.  Then I blended both with a grunge map as a mask.  Again, you can use a standard noise modifier as well instead of the grunge.


I then added this composite to a VrayDisplacementMod.  I know most now are using 3d mapping, but I still find 2d mapping very useful for purposes like these.  I played with the amount and the resolution until I achived the desired look.

And as you can see, the road now has a bit more depth to it.


Wet Surface


Now, let's say you want to make the asphalt have that wet look, with some scattered puddles.  Well, there are many ways to go about achieving that.  You can go back to each material and play with its glossiness level to achieve the desired reflection. Or, the way I chose to do it, you can create yet another mask and apply it to each of the material's coat glossiness slots.


Start with a standard grunge mask that resembles wet puddles (you can find some online or create your own).  Yet again, another VrayDistanceTex to lighten up the mask where it nears the curb, to simulate more wetness collected by the side of the road.  A composite mask to blend the two.  Connect this mask to the coat glossiness slots of each of the created materials and make sure to set their coat paramaters to 1.0. Like this ..


...and Voila!  A wet surface ...


Conclusion


Hopefully, you have found this guide to be enlightening as to some of the tools at our disposal when we want to create procedurally complex materials.  Asphalt, is one of those materials that require our attention, particularly if the surface will be highly visible in our foreground.


Once you perfect the material, consider scattering some leaves, some twigs, some stones.  All of these elements will come together to increase the realism of your renderings.


​​​​​​​Below, you will find a video version of this tutorial.